Compiling OpenJDK 7 with Ubuntu 12.04 64bit

When Sun Microsystems was still the head of Java, the wise decision to OpenSource it was made. (Thank you, whoever was behind it…) OpenJDK as of today can be built without any binary plugs, so it can be considered as really OpenSource and free. To exercise the liberty of building your own, runnable Java it takes amazingly low effort – that is the topic if this short blog entry.

While consumers and corporate IT seems to prefer Windows as primary operating system, developers tend to choose a unixoid OS: Linux (Debian, Arch, Ubuntu), Apple OSX or OpenSolaris. OpenSolaris lacks a current open source desktop distribution Ubuntu was chosen for this example. To add some complexity Canonical went with a multi-arch setup since Ubuntu 11.04 which looks like being extended/change on Ubuntu 12.04. (This is described on the MultiArch wiki page. We will come back to the problems caused by the transition later in the article.)

In order to retrieve the OpenJDK sources mercurial has to be installed:

sudo apt-get install mercurial

OpenJDK contains many sub-projects, in order to be able to manage the sources separately, the hgforest extension to mercurial is used. Installing it is a little more effort:

  • Clone the hgforest sources: hg clone https://bitbucket.org/pmezard/hgforest-crew/overview/ "$HOME/hgforest"
  • Add the hgforest extension to your mercurial setup by editing ~/.hgrcand adding
    [extensions]
    forest=~/hgforest/forest.py
  • Please adjust the path accordingly, if you did not clone it to your home directory

As a last preparational step build time library dependencies have to be installed:

sudo apt-get install gawk g++ libcups2-dev libasound2-dev libfreetype6-dev libx11-dev libxt-dev libxext-dev libxrender-dev libxtst-dev libfontconfig1-dev

Now it is time to retrieve the OpenJDK7 sources – use the „7u“ repository in order to retrieve the latest update release sources:

hg fclone http://hg.openjdk.java.net/jdk7u/jdk7u openjdk7u

The time depends on your internet connection of course, but it should not take longer than a couple of minutes with a consumer class broadband connection. (Calculate about 1GB of hard disc space for the sources and build output.)

Please make sure that you have a Java compiler installed, it is needed during building OpenJDK. (Of course you can use OpenJDK itself, once it has beend build.) For this tutorial a current Java JDK has been placed at /usr/lib/jvm/jdk1.7.0

After preparation is finished we can build OpenJDK on Ubuntu:

cd openjdk7u
unset JAVA_HOME
export LANG=C
export ALT_BOOTDIR="/usr/lib/jvm/jdk1.7.0"
export ALLOW_DOWNLOADS=true
export EXTRA_LIBS=/usr/lib/x86_64-linux-gnu/libasound.so.2
make sanity && time make

The "ALLOW_DOWNLOADS" parameter is used by the build system to retrieve additional libraries which are required for building and may be missing in the system wide installation. Note the "EXTRA_LIBS" environment entry: This is due to building on a 64 bit Ubuntu using the MultiArch setup. The OpenJDK build system itself does not detect where the alsa sound libraries are installed on this particular setup.

After a while (about 20 minutes, depending on your machine), you should see this:

#-- Build times ----------
Target all_product_build
Start 2012-05-12 11:40:32
End 2012-05-12 12:04:01
00:01:27 corba
00:10:15 hotspot
00:00:18 jaxp
00:00:27 jaxws
00:10:30 jdk
00:00:32 langtools
00:23:29 TOTAL
-------------------------
real 23m30.532s
user 32m10.625s
sys 2m24.617s

The OpenJDK build is created in build/linux-amd64 – you can run your Java from there:

./build/linux-amd64/bin/java -version
openjdk version "1.7.0-internal"
OpenJDK Runtime Environment (build 1.7.0-internal-tkruse_2012_05_11_20_23-b00)
OpenJDK 64-Bit Server VM (build 23.0-b21, mixed mode)

Bonus: OpenJDK 8 is building accordingly. Just substitute the mercurial clone path http://hg.openjdk.java.net/jdk7u/jdk7u/  with http://hg.openjdk.java.net/jdk8/jdk8/

The build result should look like this:
-- Build times ----------
Target all_product_build
Start 2012-05-12 11:10:35
End   2012-05-12 11:35:00
00:01:30 corba
00:10:30 hotspot
00:00:19 jaxp
00:00:24 jaxws
00:11:08 jdk
00:00:34 langtools
00:24:25 TOTAL
-------------------------

And you can run your own Java 8 now:
./build/linux-amd64/bin/java -version
openjdk version "1.8.0-internal"
OpenJDK Runtime Environment (build 1.8.0-internal-tkruse_2012_05_12_11_10-b00)
OpenJDK 64-Bit Server VM (build 24.0-b09, mixed mode)

As a side note: If you are using Java Native Access (JNA) on an Ubuntu 12.04 64bit machine and you have problems with libraries not being detected properly, update to JNA 3.4, fixes have been incorporate there.

 

Java Testing best practice: Projekt Organisation

Im folgenden wird beschrieben, wie man sein Projekt so strukturieren kann, dass auf der einen Seite das Testen erleichtert wird, auf der anderen Seite die Tests vom produktiven Java Quellcode separiert werden. Das erleichtert zum Beispiel die Paketierung zur Auslieferung an Kunden, die lediglich den produktiven Quellcode erhalten sollen.

Bei einigen Entwicklungsumgebungen, wie z.B. Netbeans, ist bereits bei einem leeren Java Projekt eine Separierung von Test Quellcode und Java Quellcode vorgesehen: Es gibt einen Ordner für „Test Packages“ und einen für „Source Packages“. Im Dateisystem werden diese auf die Ordner „src“ und „test“ entsprechend abgebildet. Bei der Tastenausführung werden aus beiden Verzeichnissen die Quellen übersetzt und die Ergebnisse zusammen geführt. Bei dem von Netbeans standardmäßig erstellten Buildfile kann man auch von der Kommandozeile mittels „ant test“ die Tests ausführen, bei „ant jar“ wird eine JAR Datei (im „dist“ Verzeichnis) erstellt, die lediglich den produktiven Code enthält. weiterlesen


JPA Einführung: Entity Klassen

Nachdem im ersten Teil der JPA Einführung die Infrastruktur für die Arbeit mit JPA fertig gestellt wurde, kommen wir nun zu den Entitätsklassen. Bei den Entities handelt es sich um ganz normale Java Klassen (POJOs), die kein spezielles Interface implementieren oder von einer vorgegebenen Oberklasse erben müssen. Lediglich ein default Konstruktor muss vorhanden sein.
Dank JPA Annotationen kann man erkennen, dass die Objekte persistiert werden.
Möchte man EJB3 konform arbeiten, so sollten die Annotationen dort angebracht werden, wo auf die Properties zugegriffen wird: An den Attributen für field-access, an den Getter-Methoden bei property-access. Dies sollte konsistent gemacht werden, und die beiden Formen sollten nicht gemischt werden. (Zwischen den beiden Formen wird über die Position der @Id Annotation unterschieden.)
Die Annotation der Attribute hat dabei den Vorteil, dass schnell erkennbar ist, was wie persistiert wird – kann jedoch bei einigen JPA Providern zu Performance Problemen führen. Auf der anderen Seite führen Getter-Methoden, die nicht zu persistierende Werte liefern und nicht explizit von der Persistierung ausgenommen werden zu möglicherweise schwer zu findenden Programmfehlern. weiterlesen


Spring Integration 2:RC1

Von der Firma SpringSource wurde jetzt „Spring Integration 2“ als Release Candidate 1 veröffentlicht. Spring Integration ist eine auf dem Spring Framework aufbauendes Framework das Enterprise Application Integration und die EAI Patterns von Hohpe und Woolf umsetzt. Dabei unterstützt Spring Integration Messaging innerhalb von Spring Anwendungen und ermöglicht so einen modularen und lose gekoppelten Aufbau der Anwendung, externe Systeme können jedoch deklarativ zusätzlich angebunden werden.

Spring Integration 2 bringt bereits Adapter für die Anbindung von verschiedenen Systemen wie Messaging (JMS, XMPP), FTP, Mail, Webservices und auch spezielle Dienste wie Twitter mit. Neu ist in der Version 2 von Spring Integration dass die Spring Expression Language verwendet werden kann, und in der Eclipse basierten Spring Source Toolsuite (STS) ein grafischer Editor für die Modellierung der  Spring Integration Realisierung vorhanden ist. weiterlesen


JPA Tutorial: JPA Einrichtung

JPA, die Java Persistence API bietet im Vergleich zu JDBC ein erhöhtes Abstraktionsniveau und ermöglicht damit in kurzer Zeit Anwendungen zu entwickeln, in denen Daten dauerhaft gespeichert werden müssen.
Zum Hintergrund von JPA: Bei dem Umgang mit Datenbanken gibt es schon sehr lange JDBC (Java Database connectivity) als einheitliche API um die Verbindung zu Datenbanken herzustellen. Auch hier handelt es sich bereits um eine einheitliche Schnittstelle, jedoch wird darüber lediglich festgelegt, wie Verbindungen aufgebaut werden, wie eine Abfrage eingeleitet wird und wie Transaktionen manuell gesteuert werden können.
Damit bleiben zwei Probleme: Der SQL Code muss von Hand erstellt werden, was gerade bei CRUD (Create, Update, Delete) Anwendungen viel Produktivität kostet, und zudem ist der SQL Code in der Regel herstellerabhängig. Ein Wechsel von Oracle zu Postgres bedeutet damit das Programm an vielen Stellen ändern zu müssen. Auch sind händisch erstellte Abfragen nicht immer optimal: Lazy loading von Entitäten, Caching Strategien und Transaktionssteuerung können sehr aufwendig werden. Dazu gesellen sich der relativ hohe Wartungsaufwand und die Gefahr von Fehlern die erst zur Laufzeit entdeckt werden. weiterlesen


Versioning and signing jar files in Netbeans

Hi again,

these days i’ve got the problem that i need to add a version number to the SteelSeries java component library and to be honest i had no idea how to realize it.

So after a short internet research i figured out that there is the ability to add version information to the manifest file that’s included in a jar file.

If you do not know what a manifest is or how it is embedded in the jar file you will find a detailled description here.

Now that i knew where to put the version information the question was how to get Netbeans adding this information automaticaly to the manifest file during the build process. Well Netbeans is using Ant under the hood to build your projects and because i knew ant build scripts from using the Hudson Continues Integration server it was easy to achieve this.

First of all you have to locate the build.xml file in your Netbeans projects folder. Simply open it in Netbeans itself and you will see something like this… weiterlesen


SteelSeries update

Hi there,

this is just to inform you that there is a updated version of the Java Swing component library „SteelSeries“ available.

I added 10 more components…

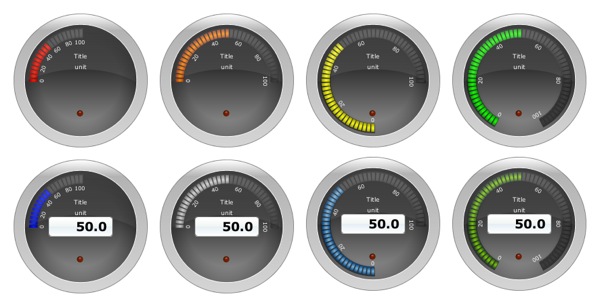
There are radial bargraphs which you could see below

ishot-4.png


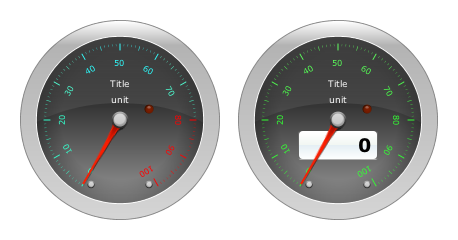
In addition to these i added another version of the Radial2 component which is called Radial2Top

ishot-6.pngThe last component i added is called RadialCounter. I saw this kind of component during a visit of a german u-boat
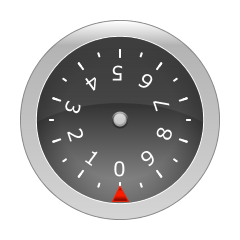
where it was used to visualize the depth of the boat.

ishot-7.png


In addition to the new components there a some more modifications like colored tickmarks etc.

ishot-5.png


For more info please go to http://www.harmonic-code.org


Follow me on twitter if you like…


SteelSeries Java Swing component library

Here we go again…

A few months ago i started a new project where i again focussed on gauges (i love that stuff). It took me some time because i only work on the project on my spare time (which is rare) but now i finished a first version of a little library that contains a lot of gauges for Java applications…

First of all i have to mention that this library was not meant to be a professional components library and should not be used on mission critical software. Means if you use the library it’s on your own risk !

I’ve never before created a component library and for me it was and is a great challenge to dive deeper into the Java universe…

But now let’s have some fun…

The library contains two general types of gauges, radial and linear ones and some little candy in the form of additional components like a Radar component etc.

I add some properties to the gauges that hopefuly will be useful for some of you.

Here is a short list of the most interesting features:

  • frameDesign (metal, shiny metal, blackmetal)
  • backgroundColor (dark gray, light gray, white, black, beige, red, green blue)
  • pointer/bar color (red, green, blue, yellow, orange)
  • a three colored track to visualize areas of special interest (e.g. a critical temperature range)
  • thresholdIndicator
  • blinking threshold led (red, green, blue, orange, yellow)
  • adjustable tickmarks
  • indicators for min. and max. measured values
  • auto reset to zero feature

It should be possible for you to create your own components out of these library and  if you’ll take a look at the source you will find components like Radial1Lcd, Radial2Lcd and Radial3Lcd where i used Netbeans matisse gui builder to create the component from the FrameCircular and DisplaySingle components.

So you should be able to check read the sourcecode of these components and see how i did it (the easiest way would be to use Netbeans to check the source).

But to give you a impression, let pictures speak… weiterlesen


Android AutoConversion EditText component

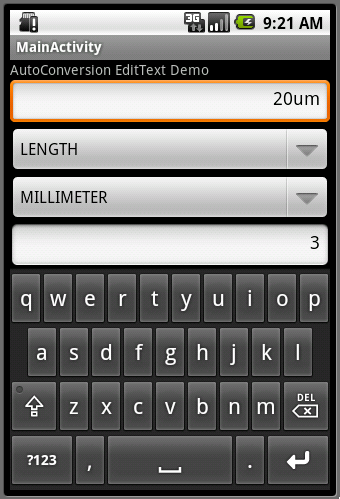
AutoConversion EditText component:

Yesterday i created a Java Swing textfield component that autoconverts a given value into a selectable unit which could be useful.

In the evening i got the idea to port this component to Android and see if it will work there.

Just as a short note…if you are a Java developer you should take a look into Android…it’s sooooo nice, porting the component tooks me not more than 2 hours (and i’m not really into Android development).

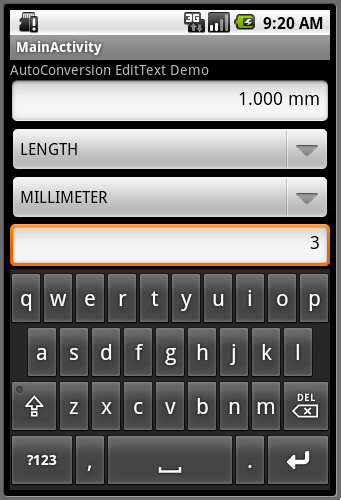
Here is the result:

ishot-2.pngishot-3.pngishot-4.png


So you could type in a value with the unit of your choice and after leaving the field the value will be converted into the EditText „base unit“.

I changed the units with special characters like µ, Å, ² and ³ to u, A, 2 and 3 which leads to units like:

um  <=>  µm

A <=>  Å

m2  <=>  m²

m3  <=>  m³

and so on…

The upper spinner will select the type of unit you would like to use.

The middle spinner will select the current base unit for the textfield.

The lower spinner will adjust the number of decimals for the textfield.

Because it displays the unit directly in the textfield there’s no need for a additional label for the unit.

You also might check this little video

Well again this is nothing very fancy or gui related but it was a nice challange for me so i decided to share it with you… AutoConversionField.zip


follow me on twitter if you like…