Drawing in code:
Part 2 (Transfer the prototype into swing):
So you will find out that this is not magic but only drawing the same elements that we used in the vector drawing programm but now in their Java2D representations. We just create a buffered image with the same size as the prototype. So we could use the same pixelcoordinates for the shapes and gradients in swing.
| In Adobe Fireworks you have the ability to move the mousecursor over a pixel and you could see the pixelcoordinate and it’s color values in a window, this is nothing special but it’s a needed functionality to grab the positions of all the shapes and the colors of the gradients from the prototype.Keep in mind that i won’t show how i pick all these coordinates and colors, but you have to do this | 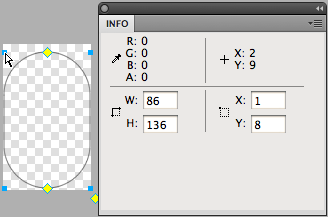 |
Step 1. – 5.
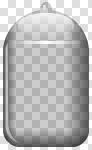
First coding the vertical pill which is in principle just a rounded rectangle with a corner radius of it’s width.
After that we code the rounded rectangle that will represent the bottom if the tube.
Now follows the small ellipse on the top.
After all we combine all of these shapes into one which is really easy in swing.
Just take a look at the code:
/**
* Tutorial Step 1. - 5.
* Create the glass tube form
*/
final java.awt.geom.Area TUBE = new java.awt.geom.Area(new java.awt.geom.RoundRectangle2D.Float(1, 8, 86, 136, 86, 86));
final java.awt.geom.Area TUBE_BOTTOM = new java.awt.geom.Area(new java.awt.geom.RoundRectangle2D.Float(1, 75, 86, 70, 30, 30));
final java.awt.geom.Area TUBE_TOP = new java.awt.geom.Area(new java.awt.geom.Ellipse2D.Float(38, 0, 12, 18));
TUBE.add(TUBE_TOP);
TUBE.add(TUBE_BOTTOM);
Step 6.
Create and apply a horizontal gradient to the tube.
/**
* Tutorial Step 6.
* Create and apply the left to right gradient
*/
final java.awt.geom.Point2D START_LEFT = new java.awt.geom.Point2D.Float(0,0);
final java.awt.geom.Point2D STOP_RIGHT = new java.awt.geom.Point2D.Float(86,0);

final float[] FRACTIONS_LEFT_TO_RIGHT =
{
    0.0f,
    0.15f,
    0.4f,
    0.6f,
    0.75f,
    1.0f
};

final java.awt.Color[] COLORS_LEFT_TO_RIGHT =
{
    new java.awt.Color(0.0f, 0.0f, 0.0f, 0.5f),
    new java.awt.Color(0.0f, 0.0f, 0.0f, 0.3f),
    new java.awt.Color(0.0f, 0.0f, 0.0f, 0.1f),
    new java.awt.Color(0.0f, 0.0f, 0.0f, 0.1f),
    new java.awt.Color(0.0f, 0.0f, 0.0f, 0.3f),
    new java.awt.Color(0.0f, 0.0f, 0.0f, 0.5f)
};

final java.awt.LinearGradientPaint LEFT_TO_RIGHT_GRADIENT = new java.awt.LinearGradientPaint(START_LEFT, STOP_RIGHT, FRACTIONS_LEFT_TO_RIGHT, COLORS_LEFT_TO_RIGHT);

g2.setPaint(LEFT_TO_RIGHT_GRADIENT);
g2.fill(TUBE);
Step 7.
Now create and apply a vertical gradient from top to bottom to the same tube shape.
/**
* Tutorial Step 7.
* Create and apply the top to bottom gradient
*/
final java.awt.geom.Point2D START_TOP = new java.awt.geom.Point2D.Float(0,0);
final java.awt.geom.Point2D STOP_BOTTOM = new java.awt.geom.Point2D.Float(0,146);

final float[] FRACTIONS_TOP_TO_BOTTOM =
{
    0.0f,
    0.9f,
    1.0f
};

final java.awt.Color[] COLORS_TOP_TO_BOTTOM =
{
    new java.awt.Color(0.0f, 0.0f, 0.0f, 0.0f),
    new java.awt.Color(0.0f, 0.0f, 0.0f, 0.0f),
    new java.awt.Color(0.0f, 0.0f, 0.0f, 0.6f)
};

final java.awt.LinearGradientPaint TOP_TO_BOTTOM_GRADIENT = new java.awt.LinearGradientPaint(START_TOP, STOP_BOTTOM, FRACTIONS_TOP_TO_BOTTOM, COLORS_TOP_TO_BOTTOM);

g2.setPaint(TOP_TO_BOTTOM_GRADIENT);
g2.fill(TUBE);
Step 8. – 9.
So let’s add the side light effect. So we code two roundedrectangles and subtract one from another. Let’s take a look at the code:
/**
* Tutorial Step 8. - 9.
* Create the side light reflection shape
*/
final java.awt.geom.Area SIDE_LIGHT_EFFECT = new java.awt.geom.Area(new java.awt.geom.RoundRectangle2D.Float(3, 43, 36, 99, 18, 18));
final java.awt.geom.Area EFFECT_SUB = new java.awt.geom.Area(new java.awt.geom.RoundRectangle2D.Float(7, 37, 36, 105, 18, 18));
SIDE_LIGHT_EFFECT.subtract(EFFECT_SUB);
et voila…that was easy
Step 10.
Now we have to create and apply a horizontal gradient for this side light effect.
/**
* Tutorial Step 10.
* Create and apply the side light gradient
*/
final java.awt.geom.Point2D SIDE_LIGHT_EFFECT_START = new java.awt.geom.Point2D.Float(3, 0);
final java.awt.geom.Point2D SIDE_LIGHT_EFFECT_STOP = new java.awt.geom.Point2D.Float(13, 0);

final float[] SIDE_LIGHT_EFFECT_FRACTIONS =
{
    0.0f,
    1.0f
};

final java.awt.Color[] SIDE_LIGHT_EFFECT_COLORS =
{
    new java.awt.Color(1.0f, 1.0f, 1.0f, 0.5f),
    new java.awt.Color(1.0f, 1.0f, 1.0f, 0.0f)
};

final java.awt.LinearGradientPaint SIDE_LIGHT_EFFECT_GRADIENT = new java.awt.LinearGradientPaint(SIDE_LIGHT_EFFECT_START, SIDE_LIGHT_EFFECT_STOP, SIDE_LIGHT_EFFECT_FRACTIONS, SIDE_LIGHT_EFFECT_COLORS);

g2.setPaint(SIDE_LIGHT_EFFECT_GRADIENT);
g2.fill(SIDE_LIGHT_EFFECT);
Step 11.
Next thing to code is the ellipse on top of the tube which will be the top light reflection.
/**
* Tutorial Step 11.
* Create the top light effect ellipse
*/
final java.awt.geom.Ellipse2D TOP_LIGHT_EFFECT = new java.awt.geom.Ellipse2D.Float(17, 11, 52, 21);
Step 12.
Now we have to create and apply the gradient for this top light reflection.
/**
* Tutorial Step 12.
* Create and apply the top light gradient
*/
final java.awt.geom.Point2D TOP_LIGHT_EFFECT_START = new java.awt.geom.Point2D.Float(0, 11);
final java.awt.geom.Point2D TOP_LIGHT_EFFECT_STOP = new java.awt.geom.Point2D.Float(0, 32);

final float[] TOP_LIGHT_EFFECT_FRACTIONS =
{
    0.0f,
    1.0f
};

final java.awt.Color[] TOP_LIGHT_EFFECT_COLORS =
{
    new java.awt.Color(1.0f, 1.0f, 1.0f, 0.5f),
    new java.awt.Color(1.0f, 1.0f, 1.0f, 0.0f)
};

final java.awt.LinearGradientPaint TOP_LIGHT_EFFECT_GRADIENT = new java.awt.LinearGradientPaint(TOP_LIGHT_EFFECT_START, TOP_LIGHT_EFFECT_STOP, TOP_LIGHT_EFFECT_FRACTIONS, TOP_LIGHT_EFFECT_COLORS);

g2.setPaint(TOP_LIGHT_EFFECT_GRADIENT);
g2.fill(TOP_LIGHT_EFFECT);
Step 13.
This one is ease, just a small ellipse on top.
/**
* Tutorial Step 13.
* Create the small light effect ellipse
*/
final java.awt.geom.Ellipse2D SMALL_TOP_LIGHT_EFFECT = new java.awt.geom.Ellipse2D.Float(39, 3, 4, 6);
Step 14.
And again create and apply the right gradient for the reflection effect.
/**
* Tutorial Step 14.
* Create and apply the small light effect gradient
*/
final java.awt.geom.Point2D SMALL_TOP_LIGHT_EFFECT_START = new java.awt.geom.Point2D.Float(0, 3);
final java.awt.geom.Point2D SMALL_TOP_LIGHT_EFFECT_STOP = new java.awt.geom.Point2D.Float(0, 9);

final float[] SMALL_TOP_LIGHT_EFFECT_FRACTIONS =
{
    0.0f,
    1.0f
};

final java.awt.Color[] SMALL_TOP_LIGHT_EFFECT_COLORS =
{
    new java.awt.Color(1.0f, 1.0f, 1.0f, 0.3f),
    new java.awt.Color(1.0f, 1.0f, 1.0f, 0.0f)
};

final java.awt.LinearGradientPaint SMALL_TOP_LIGHT_EFFECT_GRADIENT = new java.awt.LinearGradientPaint(SMALL_TOP_LIGHT_EFFECT_START, SMALL_TOP_LIGHT_EFFECT_STOP, SMALL_TOP_LIGHT_EFFECT_FRACTIONS, SMALL_TOP_LIGHT_EFFECT_COLORS);

g2.setPaint(SMALL_TOP_LIGHT_EFFECT_GRADIENT);
g2.fill(SMALL_TOP_LIGHT_EFFECT);
Step 15.
We are coming slowly to the end, now creating the small rectangle for the stripe reflection.
/**
* Tutorial Step 15.
* Creating the rectangle for the stripe light effect
*/
final java.awt.geom.Rectangle2D STRIPE_LIGHT_EFFECT = new java.awt.geom.Rectangle2D.Float(13, 46, 62, 1);
Step 16.
Finally create and apply the gradient for the stripe reflection.
/**
* Tutorial Step 16.
* Create and apply the stripe light effect gradient
*/
final java.awt.geom.Point2D STRIPE_LIGHT_EFFECT_START = new java.awt.geom.Point2D.Float(13, 0);
final java.awt.geom.Point2D STRIPE_LIGHT_EFFECT_STOP = new java.awt.geom.Point2D.Float(75, 0);

final float[] STRIPE_LIGHT_EFFECT_FRACTIONS =
{
    0.0f,
    0.5f,
    1.0f
};

final java.awt.Color[] STRIPE_LIGHT_EFFECT_COLORS =
{
    new java.awt.Color(1.0f, 1.0f, 1.0f, 0.0f),
    new java.awt.Color(1.0f, 1.0f, 1.0f, 0.5f),
    new java.awt.Color(1.0f, 1.0f, 1.0f, 0.0f)
};

final java.awt.LinearGradientPaint STRIPE_LIGHT_EFFECT_GRADIENT = new java.awt.LinearGradientPaint(STRIPE_LIGHT_EFFECT_START, STRIPE_LIGHT_EFFECT_STOP, STRIPE_LIGHT_EFFECT_FRACTIONS, STRIPE_LIGHT_EFFECT_COLORS);

g2.setPaint(STRIPE_LIGHT_EFFECT_GRADIENT);
g2.fill(STRIPE_LIGHT_EFFECT);
| Prototype | Swing |
|---|---|
 |
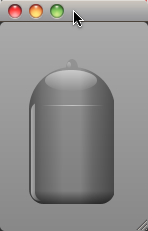 |
Conclusion:
As you can see transfering an image to swing is not rocket-science. To achieve this you have to get a feeling for drawing effects like light reflections, shadows etc. (and i’m really not a designer).
So my recommendation is follow design blogs, play with your drawing program or just walk around with open eyes and take pictures of intersting things…there are so many of them…
Please find the related Netbeans project here DrawInCode.zip
Now enjoy swinging…
Hi,
thanks a lot for your great tutorial. I really enjoyed reading it.
Great work.
Another tip from my side to save some time in creating the java code.
Draw your graphics with your tool. Export is as SVG and use
Kirill Grouchnikov’s SVG to Java converter. It is not perfect but works with most graphics. This eleminates the dependency on a SVG renderer such as Barik and the result is pure Java 2D. Read on here …
http://weblogs.java.net/blog/kirillcool/archive/2006/10/svg_and_java_ui_3.html
Have fun,
– Bernd
Awesome! Thank you very much for sharing.